

How To Draw An Image Without Background In Gimp 2.8
The version of Okular existence prepared by the KDE community volition add together new markup options. Among these options we volition have the possibility of cartoon arrows, something that is perfect for pointing out parts of a document or indicating that something is related to another part of information technology. Until recently, many users and I used the Shutter editor, but the screenshot program has been discontinued. On the other hand, we have Photoshop'due south gratuitous rival, but information technology doesn't come with certain default options. And then How to depict arrows in GIMP?
While waiting to test it, the future version of Okular that nosotros have mentioned in a higher place will allow u.s. to add arrows to images and other types of documents. The problem is that the KDE document viewer can perform few editing tasks, so information technology is not useful, for case, to add several icons in PNG format in the same image. If we want to have everything in the same awarding, we can add a script which will allow us to describe arrows in GIMP from with various shapes.
Drawing arrows in GIMP is possible by adding a script
The process is simple. You simply take to follow these steps:
- We download this file.
- We unzip it.
- We have to put that file in the GIMP add together-ons folder. I could tell you where information technology is, just since there are different types of packages, information technology is best to look at where it is configured on your computer. To run into the road, let'south Edit / Preferences / Folders / Plugins.
- If we had GIMP open, nosotros restarted it.
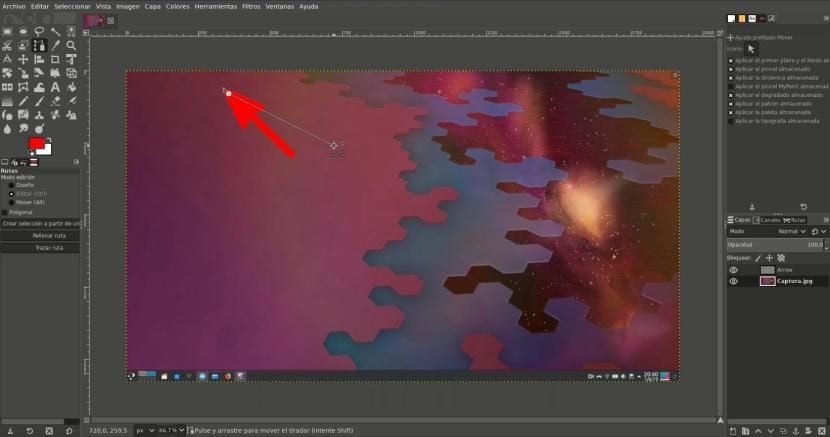
- The pick will appear as "Arrow" in the Tools carte du jour, but first nosotros will have to testify it the way. To do this, we volition choose the routes tool. The drawing looks like it has a spray or canteen with a vertical line with 3 dots to the left.
- We indicate a path.
- Now, nosotros choose the Tools / Arrow option.
- There are many values here that we tin can modify and this will depend on what each user prefers. The moment we click OK, the arrow volition exist drawn. Across the thickness of the lines, if the arrow has a closed head, etc., I retrieve it is important to mention the two types of arrows that can be fabricated, equally you volition see in the following video:
- If we click, release and brand a 2nd click, it will make us a normal arrow.
- If we click and drag, it volition make us an arrow like that of a GPS navigator or compass. Keep in mind that if we want to describe this second pointer, we accept to choose that the head is filled and the size has to be much larger than that of the normal arrow.
Nosotros can treat the arrow similar any other layer
The arrow will be drawn on a new layer. This means that we can modify information technology similar whatsoever other layer, which includes rotating it, resizing it, skewing it, and so on. We can also add together effects, such every bit the shadow. My intention at first is to brand markings, so I will rarely add any extra effects to it.
Another option: find arrows in PNG format without a background
Another option that could exist much more aesthetic is to add an arrow that is already made. Yes nosotros search in Google Images «pointer png» or «arrow png», to which we can add a color, dozens of arrows will appear in that format. Some of these arrows will have a white background, but most will just be the arrow. The idea is to simply drag the pointer into GIMP and modify its shape, size, and orientation. The chief problem that I meet with this method and the reason why I adopt to use the script "Pointer" is that adding an image volition not exist every bit fast every bit using a tool bachelor from GIMP. Or not unless nosotros get out it on the desk, something I will never do because I like to continue my desks clean.
What is your preferred system for drawing arrows in GIMP?
The content of the article adheres to our principles of editorial ethics. To study an fault click here!.

Source: https://ubunlog.com/en/how-to-draw-arrows-in-gimp-in-the-simplest-way/
Posted by: leclairformar.blogspot.com
0 Response to "How To Draw An Image Without Background In Gimp 2.8"
Post a Comment